Tuesday, March 31, 2015

Tasty Tuesday: Lemon Dijon Chicken Pasta

If you've been reading Divulge and Indulge for any length of time, you've probably discovered that I really love pasta. Not only is it quick, easy, and filling, it's also versatile. There are tons of types of pasta and just as many (if not more!) types of sauce. Pasta was one of the first things I experimented with when I was learning to cook, and it remains one of my favorite things to play around with in the kitchen.

The recipe I'm sharing today is a perfect example of what happens when I decide to experiment a bit with pasta. I took a simple chicken recipe and decided to tweak it to make a creamy, delicious (and completely unhealthy!) pasta dish.

 photo LemonDijonChickenPasta_zpscpdtqes5.jpg
It may not look like much, but this creamy pasta has a rich, tangy flavor. Delicious!


I've been on a bit of a Dijon mustard kick lately, so I was excited to try it in a pasta sauce. The lemon, Dijon, and capers created a rich, tangy sauce, while the shallot and white wine added a hint of sweetness. It was just as good as I'd hoped it would be ... Almost good enough to be worthy of a restaurant!

Since it contains quite a bit of heavy cream, this dish is a little too decadent to eat on a regular basis. But if you're looking for something a little different (and you're not counting calories!), I'd highly recommend giving this a try. I'll definitely be making it again in the future!


Lemon Dijon Chicken Pasta

Adapted from a recipe on Campbell's Kitchen.


Ingredient List:
  • 1 box short pasta (I used Garofalo organic gemelli from Costco)
  • 3-4 boneless, skinless chicken breasts (I only used 3, but they were very large)
  • 2 tbsp olive oil
  • 1 lemon
  • 1 medium shallot, diced
  • 2 tbsp capers, rinsed and drained
  • 1 1/4 cups heavy cream
  • 1/4 cup white wine
  • 1 clove garlic (or, if you're lazy like me, the equivalent of jarred, pre-minced garlic)
  • 2 tbsp Dijon mustard
  • 2 tsp sea salt
  • 2 tsp black pepper
  • Shredded Parmesan cheese for serving

Instructions:

1.  Bring a large pot of salted water to a boil.

2.  Heat the olive oil in a large skillet over medium high heat. Season the chicken with the sea salt and black pepper and cook until browned on both sides.

3.  While the chicken is cooking, add the pasta to the boiling water. Cook according to package instructions until al dente and drain.

4.  Once the chicken is completely cooked through, remove it from the skillet. (I just placed mine on a cutting board so that I could cut it up into smaller cubes. It's entirely optional to cut up the chicken for this meal, but I typically like to have smaller pieces of chicken in my pasta so I can get a bite of meat with each bite of noodles.)

5.  Remove any excess oil from the skillet. Turn the heat down to medium and cook the shallot and capers for 2 minutes, stirring occasionally.

6.  Squeeze in the juice from the lemon and add the garlic. Cook for another 30 seconds (or until the garlic is fragrant), stirring the mixture several times as it cooks.

7.  Pour in the heavy cream, white wine, and Dijon mustard and bring the sauce to a boil.

8.  Reduce the heat to low, and stir the chicken into the sauce. Cook for another 5 minutes, stirring occasionally.

9.  Remove the skillet from the heat, allowing the sauce to stand for about 5 minutes. Stir in the drained pasta, making sure to thoroughly mix it with the sauce. Top with shredded Parmesan cheese.

Since this is such a heavy dish, I served it with a simple green salad. (Okay, and a glass of white wine ... After all, what's a flavorful, creamy plate of pasta without a glass of crisp, delicious wine?)

Monday, March 30, 2015

Playlist: March 2015

As the month of March draws to a close, we're beginning to see more sunshine and warmer weather with the change of the season. And, despite the fact that I actually love cold weather (I know, I know), I thought it would be fun to celebrate the start of spring with a playlist full of hopeful songs.

 photo March2015Playlist_zpsuy0pvfr9.jpg

This playlist was actually really challenging for me to put together. If you've checked out any of my previous playlists, you've probably noticed that I typically listen to a lot of really sad and/or angry music. I found myself second guessing almost every song I wanted to add because, to be honest, some of these songs are actually kind of sad. 

As I was listening to these songs, though, I came to the realization that everyone finds hope in different things. Music is so subjective, and I think that's one of the reasons I love it so much. I love finding meaning in even the most cryptic lyrics, though I'm often guilty of applying them to my own life. And even though I'm always fascinated by what actually inspired each song (and actively seek out any information that's available), I think it's more fun to come up with your own interpretations. (I will say that I never look up any information about a song's true meaning until I've already come up with my own. And sometimes I'm actually spot on!)

With that being said, I considered sharing why I chose each song for this playlist (like I did last month) but then decided against it since it takes more time than I'm currently willing and able to put into this post. Since I'm not sharing my "deep thoughts" on each song, you may listen to some of these songs and think I'm insane for thinking they're hopeful ... But every song on this list gives me that feeling every time I hear it.

Thursday, March 26, 2015

New Restaurant 2/12 in 2015: Formosa Zen

Taking some time away from blogging means that I'm really behind in writing about our experience at another new (to us) restaurant. This is the second of 12 for the year (you can read all about the first new place we tried this year here), and it's also the second new (to us) Asian restaurant we've visited. What can I say, we love Asian food!

Formosa Zen offers a variety of dishes, including noodle soups, curries, and a few "higher end" dishes (including a Chilean sea bass and lamb chop). The menu isn't huge, but there were enough options to make it a little difficult to decide what to order.

I wish I'd taken some pictures of the interior of the restaurant, but I failed there. It was definitely fancier than Asian Dragon House, but I'd still categorize it as a casual restaurant. The restaurant was decorated mostly in black and red, and several lovely paintings hung on the walls. While it's not what I'd consider a "special occasion" kind of place, it definitely had a cool atmosphere.

I first heard about Formosa Zen when I read a review in the local paper. It sounded like the kind of place Eric and I would like, so I was excited to try it. The food was good, but I don't think it will be taking the top spot as my favorite Asian restaurant in town. I will say, though, that the crab rangoon there was so amazing that I'd go back just for that (and the delicious cocktails, of course!).

 photo FormosaZen1_zpsuwi31ito.jpg
The restaurant had 3 different versions of the Moscow Mule. Eric had the "Tokyo" and I had the
"American." Both were phenomenal!


 photo FormosaZen2_zpsstuplm1r.jpg
Here is an awkward picture of me enjoying my drink.


 photo FormosaZen3_zpsrysotmlj.jpg
The crab rangoon was, in my opinion, the best part of the meal!


 photo FormosaZen4_zpsxcsv32gr.jpg
Eric had the Amazing Curry with duck. The sauce was fairly spicy, but the breaded duck was a bit disappointing.


 photo FormosaZen5_zpsixw0vbiu.jpg
I had the Lemongrass Duck. Again, the sauce was good but I was a little disappointed that the duck was breaded.


I think I should have read the review a little more closely because when I looked at it again after our dinner, I noticed that the reviewer mentioned that the duck was breaded. I probably would have ordered the salmon if I'd remembered that. Duck is already a pretty heavy, somewhat greasy meat, so the breading was kind of overkill. I think I would have enjoyed my meal a little more (and been able to finish more of it!) if the duck hadn't been breaded. 

Overall, I had a great experience at Formosa Zen. The service was friendly and attentive, the atmosphere was nice, the cocktails were strong and tasty, the crab rangoon was fantastic, and the meals were good (other than the breading on the duck). Eric enjoyed it as well, so I'm sure we'll be going back in the future ... I just won't be ordering the duck again.

Tuesday, March 24, 2015

Tasty Tuesday: Chorizo Potato Enchiladas with Green Chile Sour Cream Sauce

When I shared the results of my monthly personal challenge for February, I promised I'd post my (somewhat) original recipe in my next Tasty Tuesday post. Then I moved to Blogger and spent 2 weeks tweaking everything and that post never happened.

Today I'm making up for that, though. And, as an added bonus, I'm also sharing what I did with the leftover filling. It's not a new concept by any means, but it's a slight variation of one of our favorite quick weeknight meals (also known as what I do when I've forgotten to plan for anything else and don't feel like making a frozen pizza or getting takeout).

 photo ChorizoPotatoEnchiladas_zpsexqpeeqj.jpg
I couldn't get a great picture of these enchiladas, but trust me ... They're delicious!


I realize that from this picture these enchiladas look almost identical to the chicken enchiladas I posted a long time ago, but I promise that the sauce is the only thing that's the same. I'd never had chorizo potato enchiladas with anything other than a red sauce, so I decided to take a risk and use this amazing sauce instead. And it was phenomenal! The flavors of the chorizo and potatoes paired wonderfully with this green chile sour cream sauce. So well, in fact, that Eric kept complimenting the meal as he devoured the enchiladas on his plate.

Don't just take my word for it, though. Try these enchiladas for yourself ... You won't be disappointed!


Chorizo Potato Enchiladas with Green Chile Sour Cream Sauce

A Divulge and Indulge original recipe. (Sauce adapted from a recipe on Taste and Tell.)


Ingredient List (Filling):
  • 3 medium Yukon Gold potatoes, peeled and diced into very small (about 1 inch) chunks
  • 0.75-1 lb chorizo sausage (I used 0.75 lbs, and that was plenty)
  • 1 tbsp olive oil
  • 1 cup white onion, diced 
  • 1/2 cup black beans, rinsed and drained
  • 1/2 tsp garlic salt
  • 1/2 tsp black pepper
  • 1/2 tsp chipotle chili powder
  • 1/2 tsp Mexican oregano

Instructions (Filling):

1.  Heat the olive oil in a large skillet over medium heat.

2.  Add the diced potatoes and onions to the skillet and season with the garlic salt, black pepper, chipotle chili powder, and Mexican oregano. Cook over medium heat until the onions and potatoes have softened a bit and the potatoes have started to brown.

3.  Crumble the chorizo sausage into the skillet with the potatoes and onions, cooking until completely browned.

4.  Stir in the black beans, and allow the mixture to cook for approximately 2 minutes (or until completely warmed through).


Ingredient List (Enchiladas):
  • 10 corn tortillas (soft taco size)
  • 2 cups shredded Mexican blend cheese (I used Sargento 4 Cheese Mexican blend, which, according to the package, includes Monterey Jack, Cheddar, Queso Quesadilla, and Asadero cheeses)
  • Cooked chorizo and potato mixture (from recipe above)

Instructions (Enchilada Assembly):

1.  Preheat the oven to 425 degrees.

2.  Spray a 9x13 inch pan with cooking spray.

3.  Warm the corn tortillas in the microwave (I zapped mine for 15-20 seconds) to make them more pliable.

4.  Place a tortilla on a plate and fill it with some of the cooked chorizo and potato mixture and some of the shredded cheese.

5.  Roll the tortilla around the filling and place it seam side down in the 9x13 inch pan. Repeat steps 4 and 5 until you've used all of your tortillas, taking care to place an equal amount of filling in each tortilla.


Ingredient List (Green Chile Sour Cream Sauce):
  • 3 tbsp low fat margarine or butter (I used low fat margarine)
  • 3 tbsp flour
  • 1 1/4 cups chicken broth
  • 1 cup sour cream (I used light sour cream to try to lighten the recipe up a bit, and it worked just as well as regular sour cream)
  • 2 4 oz. cans diced green chilies

Instructions (Green Chile Sour Cream Sauce):

1.  Melt the butter in a small pan.

2.  Stir in the flour and whisk for approximately 1 minute.

3.  Slowly whisk in the chicken broth and cook over medium heat until thickened and no lumps remain.

4.  Stir in the sour cream and green chilies until well combined.

5.  Pour the sauce over the pan of enchiladas and top with the remaining shredded cheese.

6.  Bake the enchiladas for 20-25 minutes, or until the cheese is melted and bubbly.

As I said earlier, you'll likely have leftover filling unless you stuff your enchiladas to the point of bursting or opt to make multiple pans of enchiladas (and, if you do that, you'll definitely need to double or triple the sauce recipe!). As I also said, we weren't exactly creative with our leftovers. 

I'm going to share what we did anyway, though, because the result was a delicious, simple meal that not only used up the leftover filling but also the leftover black beans (I used canned black beans and I saved the remaining beans after measuring out 1/2 cup for the enchilada filling). I hate wasting food, so it made me happy to avoid throwing anything out!

 photo ChorizoPotatoBowl1_zpsfwczivry.jpg
This is so good, you don't even realize you're eating leftovers!


Burrito bowls are a favorite lazy night meal in our house. Sometimes we brown some ground beef or turkey or grill some chicken and mix that with black beans, onions, green chilies, and spices. Sometimes we omit the meat completely and just have vegetarian burrito bowls. And sometimes we make burrito bowls in order to use up leftover enchilada or burrito filling. No matter the version, burrito bowls are always a hit with us!


Chorizo Potato Burrito Bowls

A Divulge and Indulge original recipe.


Ingredient List:
  • Leftover filling from the Chorizo Potato Enchiladas with Green Chile Sour Cream Sauce (from recipe above)
  • 1 1/4 cups black beans, rinsed and drained
  • 2 cups cooked rice (I used basmati because that's what we had on hand)
  • Shredded cheese for serving (I used the same 4 cheese Mexican blend I used in the enchiladas)
  • Sour cream for serving
  • Salsa for serving
  • Guacamole for serving

Instructions:

1.  Mix the black beans together with the leftover chorizo and potato filling and heat until completely warmed through. (I honestly just microwaved ours for about 3 minutes and it tasted great, but you could also dump everything into a pan and cook it on the stovetop if you prefer that method.)

2.  Spoon rice into a bowl and top with the black beans and filling.

3.  Top with shredded cheese, sour cream, salsa, and guacamole.

 photo ChorizoPotatoBowl2_zpsaay9kbiq.jpg
I just had to add another picture to show off all the layers in the burrito bowl.


Burrito bowls are seriously simple meals that taste amazing. If you're a fan of Chipotle and/or Qdoba burrito bowls, this is a great way to get your fix without spending $8.00 (or however much they are these days since I can't remember right now).

Monday, March 23, 2015

So ... It's Been A While

I didn't intend to stop posting for over 2 weeks, but that's exactly what happened when I decided to make some major changes to Divulge and Indulge. Although I didn't completely step away from the blog (I spent a lot of time reformatting, resizing pictures, figuring out a new look, and working on my recipe index and "About Me" page), I didn't have time to sit down and write until now. But, while I missed writing posts, the time away was actually good for me. I feel refreshed and full of ideas, and I honestly haven't felt this way in a long time.

First on the agenda is to address the changes to this blog and my move to a new platform.

After a lot of thought, I decided that I needed to make some changes to Divulge and Indulge. I did some research, weighed my options, and made a choice based on what I thought was best for me.

And now here I am on Blogger.

It's funny because so many people make the switch from Blogger to Wordpress, and I chose to do the opposite. Since this is such an unusual move, I wanted to take some time to explain why this worked best for me.

 photo WordpresstoBlogger_zpsbk9pn6lj.jpg
Image provided by Unsplash (unsplash.com) and edited by me.


1.  Customization

This is one of the biggest things that drew me away from Wordpress. I should note that I was using the free version of Wordpress (wordpress.com), so my options were extremely limited. I could pay $30/year for an upgraded version of wordpress.com, but that would really only allow me to change the colors on my blog. If I wanted to further customize my blog, I'd have to start paying a monthly fee to self host. I was looking into this for a while, but as I was looking around to see what types of designs were out there for a self hosted Wordpress site, I began to realize that blog designers tend to charge a lot for Wordpress customization (typically at least $100-$200 more than what they charge for Blogger customization).  

I really just wanted a nicer looking blog. I wasn't prepared to go the completely custom route just yet (I'd have to put a lot more thought into the design), but I definitely wanted something less generic. As I continued looking into my options, I noticed that a lot of blog designers offer great premade Blogger templates at reasonable prices. When I realized I could get something nice without shelling out tons of money, I felt like moving to Blogger was starting to make more sense.

2.  Cost

This is obviously a continuation of my last point. I wasn't paying anything to use wordpress.com. And while I'm willing to put some money into my blog, I'm not willing to spend hundreds of dollars right now ... This is just a hobby, after all!

Blogger was attractive to me because it's free to use and it offers a lot of the customization options I wanted. If I used Blogger, I could purchase a great template and have it installed for less than $100. If I stuck with Wordpress, I'd have to go the self hosted route (a.k.a. spend more money) and then pay even more to get a nice design. Yes, there are premade templates out there for Wordpress that are reasonably priced, but I'd still have to deal with the purchase of a domain name and a monthly fee for self hosting if I wanted to use one of them. Nothing out there works with wordpress.com.

3.  Potential to Make Money

As I said before, right now this blog is just a hobby. I currently don't make any money from it, and there's a good chance that I'll never make money from it. (And that's okay.) However, I don't want to close myself off from ever making money from my blog ... And by using wordpress.com, I was doing just that.

According to my research, there is only one way to make money from a wordpress.com blog: an ad service similar to Google AdSense. Sponsored posts, affiliate links, etc. aren't allowed on the free version of Wordpress. That obviously limits the potential to make money from your blog if you're using that platform. I don't think that switching to Blogger will automatically mean I'll start making money from my blog (I'm not completely delusional!), but I do think it will at least allow for that possibility in the future. (And yes, I realize I could also do this if I stuck with Wordpress and went the self hosted route, but, again, I'd have to spend more money than I'm currently willing to.)

4.  Skill Level and Time Commitment

I'm proud of myself for figuring out how to migrate my blog from wordpress.com to Blogger. It was relatively easy to do, though I had to spend a lot of time fixing links and adjusting the formatting. It was frustrating at times, and it made me realize that I definitely don't have the patience or skills to deal with this kind of thing all the time.

Blogger, like the free version of Wordpress, seems to automatically update and kind of keep itself running. If I chose to self host, I'd be responsible for all updates, security, and backups. (And guess what ... That costs more money!) I feel like some of the things I'd need to do to maintain a self hosted Wordpress blog are beyond my skill level and could potentially force me to spend more time updating and tweaking than actually writing. And that's not really something I'm interested in.

I don't necessarily think one platform is better than the other because there are pros and cons to using both. For me personally, though, Blogger offered the things I was looking for at the right price (free!). I know this wouldn't be the right move for everyone (particularly since it's much easier to move from wordpress.com to a self hosted Wordpress site than it is to move from Blogger to a self hosted Wordpress site), but Blogger seemed like the right fit for me right now.  

Saturday, March 7, 2015

Making Time for the Most Important People in My Life: My March Goals

As I said in my last post, the focus for this month's personal challenge is "relationships."

I share a lot on this blog about my relationship with my husband, some of my previous romantic relationships, and, in a couple of cases, how some of my friendships have changed (or faded away) over the years.  I'm not sure if they're the kind of posts that people like to read, but I really enjoy writing them.  I like sharing these kinds of stories and thoughts, and I always feel so great after I spend some time writing and reflecting on my feelings.  These are also my favorite kinds of posts to read on other blogs, regardless of whether I can relate to what they're saying.  Sometimes I just like to see how different or similar someone else's life experiences are to my own.  (Or maybe I'm just nosy and want to read all about other people's personal lives.)

The point is, I think and care a lot about my relationships with other people.  The problem is that as I get older, it seems to get more difficult to maintain a lot of these relationships.  We all have our own obligations: work, family, pets, hobbies ... The list goes on and on.  And since a lot of my friends and family live far away, properly keeping in touch with everyone on a regular basis becomes even more difficult.

With that in mind, I've come up with a few simple goals for March to help strengthen my relationships with the most important people in my life.

March2015Goals
Image provided by Unsplash (unsplash.com) and edited by me.

My March 2015 Goals:

1.  Call/text friends more often.  I don't love talking on the phone, but I'll definitely at least call my friend Jennifer on her birthday this month.  I'll also try to reach out to some of my other friends (probably via text) during the month to check in and catch up.

2.  Have at least one friend "date."  I already have another Skype date lined up for later this month with the same friends I spent 6 hours Skyping with on Valentine's Day (which, in my eyes, definitely counts), but I'll probably also try to either set up a one-on-one dinner with a friend or plan a group thing with some of my friends after work one day.

3.  Have a date night with Eric.  We haven't had a date night since the end of January, and I already have a restaurant in mind to try!

4.  Call my mom at least once during the month.  She and I text quite a bit, but we don't always talk on the phone (mostly because it inevitably turns into a several hour long conversation, and we don't always have time for that).  I haven't called her in a while, though, so it's probably time for one of those really long phone conversations.

5.  Continue going to yoga classes 2-3 times each week.  This is something I've been doing anyway, but it's definitely important to work on my relationship with myself (and my health!) as well as my relationships with the other people in my life.

I haven't been doing a great job sticking with my monthly goals lately, but I think I'll be able to accomplish all of these.  I'm looking forward to spending more time with the people I care most about (even if it's only via phone, text, or Skype!).

Thursday, March 5, 2015

Monthly Personal Challenge Link-up: February Results

Not Entirely Perfect

February is obviously always the shortest month of the year, but this year it seemed to pass by in the blink of an eye.  I thought I could cram a bunch of things into those 28 days, and I guess I sort of did ... But some of my create goals suffered as a result.

I was actually really excited about all of my goals this month.  I was going to better myself by spending more time on some of my favorite hobbies.  I was optimistic that I'd do more in February than I did in January.

And then life happened.

I won't say that I completely failed last month because I didn't.  But I didn't do as much as I wanted to.

To recap, my goals for February were:

1.  Create a blogging schedule for at least the next 2 months.

2.  Make an effort to write creatively at least once a week.

3.  Come up with a new way to list out the week's meal plan (preferably making some sort of graphic using PicMonkey).

4.  Create an original recipe.

5.  Finish Eric's very long overdue wedding anniversary present.

Here's how I did:

1.  I didn't even make an attempt to work on a blogging schedule.  I'm kind of pissed at myself for blowing off one of the more important things on the list, but I just wasn't motivated to do it.  So I didn't.

2.  I'll give myself a pass on writing creatively at least once a week, even though I didn't technically write much at all.  I spent a lot of February thinking about some of my ideas for novels, narrowing my focus, working through some character development, and laying out a couple of specific "scenes."  I actually only wrote a couple of times (the rest was mostly making notes or working through things in my mind), but I feel like I deserve a pass since I was at least working on some creative writing projects.  All of the things I was doing were important (at least in my opinion) and are getting me in the right frame of mind to begin the process of piecing together a manuscript.

3.  I haven't even bothered to make a meal plan in weeks, so my meal plan graphic didn't happen.  I really need to get back in the habit of making meal plans.  When I don't, we usually end up eating out a lot (or just eating random shit we find in our kitchen).  Not good.

4.  I'm going to give myself a pass on creating an original recipe even though I'm reluctant to do so.  The idea itself wasn't completely novel (though I guess a lot of recipes are just variations of something else), and I used a recipe for a sauce I've made before (which was originally slightly adapted from another recipe).  However, I didn't use a specific recipe for the overall meal, I used my own judgment when it came to measurements and types of ingredients, and the sauce was one I've never seen with these ingredients ... So I'd say that's something.  It's a stretch, but it will do.  I'll be posting it on the blog soon (probably next week for Tasty Tuesday).

5.  I'm about 95% done with my gift for Eric, so I'm going to give myself a pass on this as well.  I still can't say what it is since he reads my blog, but I can say that all I have left to do is look it over to determine if any changes need to be made, make any necessary changes, and submit the order.  It took a lot of time, but the hard part is over.  I hope he likes it as much as I think he will!

As I said earlier, February was just okay for me.  I wish I'd completed all of my goals (especially the blogging schedule since that's so important!) and that I'd done a little more creative writing (as opposed to spending so much time planning), but I wouldn't say I completely failed.  I just didn't do as well as I would have liked.

But now it's time to move on.  This month's theme is "relationships."  I have a couple of goals in mind, but this post has already gotten long enough and, as I mentioned last month, I like separating my results from my new monthly goals.  I'm weird, I guess.

I'll be back either tomorrow or Saturday with my goals for March.  I think this will be a good area for me to focus on because I've been pretty awful at keeping in touch with some of my friends lately.  It sucks, but unfortunately that's what happens when your friends are scattered all over the country (one of my friends isn't even living in the country right now ... She's in school in Europe, so it's even more difficult to find a good time to talk to her).  Anyway, I'm excited to come up with some ways to strengthen the relationships I have with the people in my life (and maybe throw in something for my relationship with myself as well!).

Tuesday, March 3, 2015

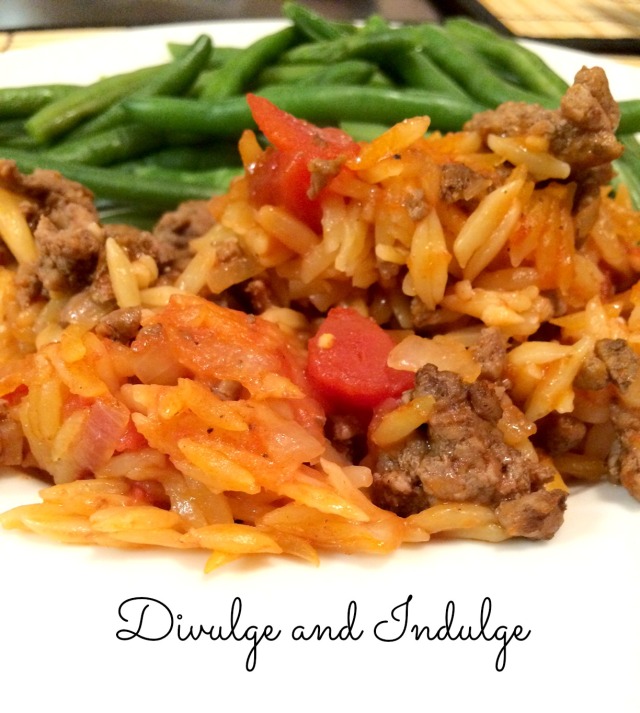
Tasty Tuesday: Arni Giouvetsi

I was really excited to write today's Tasty Tuesday post because today I'm sharing one of our favorite meals.  We don't have it that often (mostly because ground lamb is $10.00/lb and that just seems ridiculous), but when we do, we're reminded exactly why we love it so much.

As with most Greek dishes, the flavors are simple and comforting.  Arni Giouvetsi (also spelled Arni Youvetsi) reminds me of something you'd have at a large family dinner on a Sunday afternoon ... It's not particularly fancy, but it is delicious!

I don't make this dish in the traditional way (with a shoulder or leg of lamb) for two reasons: I like the way the ground lamb mixes in completely with the dish (you basically get a bite of meat with every bite of orzo, tomatoes, and onions) and, to be perfectly honest, ground lamb is easier for me to find.  If you want to try making a more traditional Arni Giouvetsi, I'd recommend clicking over to Elly Says Opa (the link to this meal can be found below the recipe title) and following her instructions.  If you're like me, though, and prefer using ground lamb, you can use the recipe below.  I didn't make that many changes from the original recipe, but some of the cook/bake times are different, so make sure you follow the instructions that correspond with the type of lamb you're using!

ArniGiouvetsi
Looking at this picture makes me sad that we don't have any more leftovers.


Arni Giouvetsi

Adapted ever so slightly from a recipe on Elly Says Opa.


Ingredient List:
  • 1-1 1/2 lbs ground lamb (I used a 1.07 lb package of ground lamb last time)
  • 1 tbsp olive oil
  • 2 tsp sea salt (plus additional to taste)
  • 2 tsp black pepper (plus additional to taste)
  • 1 white onion, diced
  • 3 cloves garlic (or, if you're lazy like me, the equivalent of jarred, pre-minced garlic)
  • 4 tbsp tomato paste
  • 1 14.5 oz. can diced tomatoes
  • 3 cups water or broth (I always use water in this recipe because I like the flavor of the lamb to shine through, but I'm sure it would also be great with chicken broth)
  • 1 16 oz. package orzo

Instructions:

1.  Preheat the oven to 300 degrees.

2.  Spray a 9x13 inch pan with cooking spray.

3.  Heat the olive oil in a medium skillet.  Add the ground lamb and season the meat with the salt and pepper.

4.  Cook the lamb until just brown, breaking it up as it cooks.  (This shouldn't take more than 20 minutes or so.)

5.  Once the lamb is cooked through, add it to the 9x13 inch pan.  (Make sure you retain at least some of the juices in the skillet for the next step!)

6.  In the same skillet, add the diced onion and cook until tender.

7.  Add the garlic and tomato paste to the onions and cook for 30-60 seconds, or until the garlic is fragrant and the tomato paste has started to cook off and become incorporated with the onions.

8.  Pour in the diced tomatoes (with their juices) and the water (or broth).  Bring the mixture to a boil, stirring occasionally.  Season to taste with additional sea salt and pepper.

9.  Cook the tomato mixture for about 3-5 minutes at a boil, then pour the liquid around the lamb in the pan.

10.  Bake uncovered for 25-30 minutes before adding the orzo.  (I used the full 30 minutes.)

11.  Remove the pan from the oven and increase the heat to 350 degrees.

12.  Add the orzo to the lamb and tomato mixture in the pan, stirring several times to ensure the orzo is completely covered with liquid.

13.  Bake uncovered for an additional 20-30 minutes, or until most of the liquid has evaporated.  (I only baked mine for 20 minutes.)

The ingredient list is pretty short and simple, but it does take some time to prepare.  It's well worth the effort, though!  As for sides, I think this meal is best served with a steamed green vegetable (I made green beans the last time we had this).