Showing posts with label vegetarian. Show all posts

Tuesday, August 30, 2016

Tasty Tuesday: Mediterranean Stuffed Peppers

To say that I've been feeling uninspired in the kitchen lately would be a huge understatement. If it requires more than 20-30 minutes, more than two pots/pans, and more than a handful of ingredients, I don't feel like making it. (Okay, if I'm being totally honest here, I'll admit that the majority of our meals these last couple of weeks have either been from a restaurant or from the freezer/a box/a jar.)

I wasn't even sure if I'd have anything to post for Tasty Tuesday this week, but then I realized that I still had a couple of recipes I've made over the last few months that I hadn't gotten around to posting yet. And, luckily, these Mediterranean Stuffed Peppers seemed like the perfect end of summer recipe.

Okay, yes ... You have to bake them. However, this meal is light and delicious and relatively healthy, and the vegetables and bright lemon flavor make me think of summer (or spring too, I guess). And, really, if you don't want to go through with the stuffed pepper portion of this recipe, that's okay too. I had extra filling left over, and it was delicious heated up as a warm lunch salad.

 photo MediterraneanStuffedPeppers1_zpselhqvkc5.jpg

Mediterranean Stuffed Peppers

Adapted from recipes on Smashed Garlic and The Mediterranean Dish.

Ingredient List (Filling):
  • 7 oz. Israeli couscous (This was about half of the package I purchased.)
  • 18-24 grape tomatoes, quartered
  • 1 14.5 oz. can quartered artichokes, roughly chopped
  • 1 14.5 oz. can chickpeas, rinsed and drained
  • 3/4-1 cup spinach, chopped (Fresh or frozen, it doesn't really matter.)

Instructions (Filling):

1.  Cook the Israeli couscous according to the package instructions.

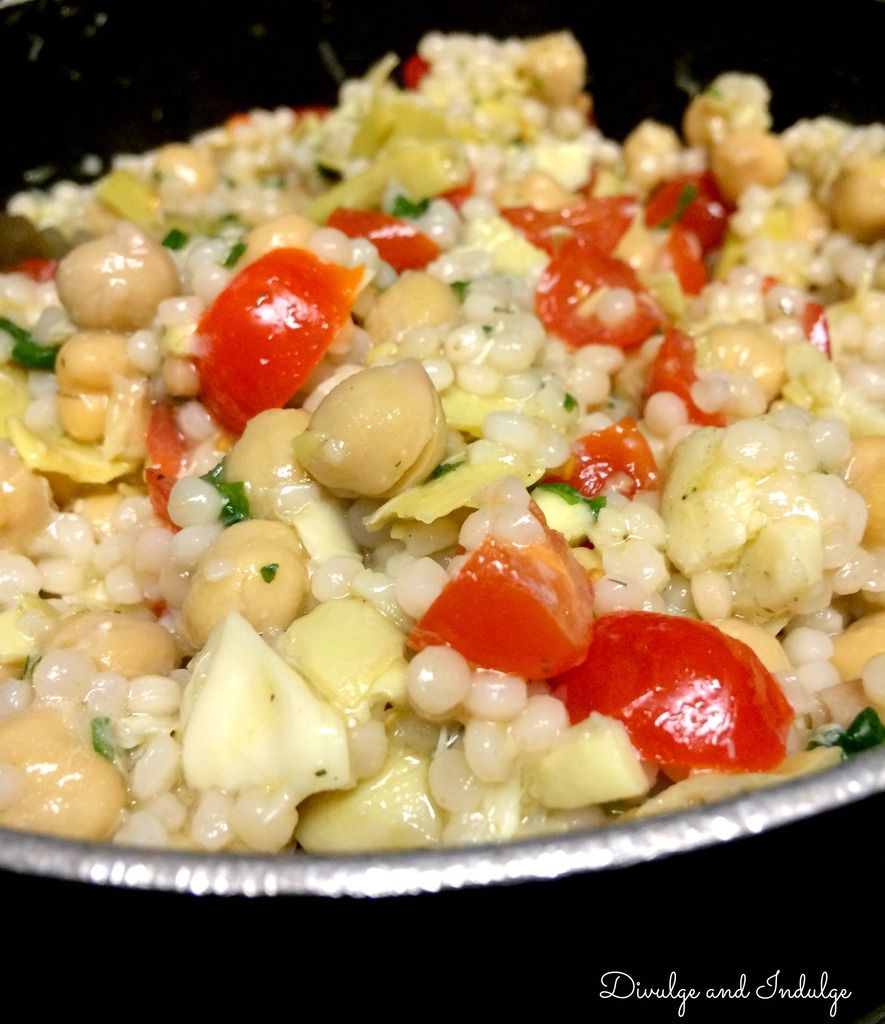
2.  Once the couscous is cooked, add the grape tomatoes, artichokes, chickpeas, and spinach. Stir several times to thoroughly combine.


Ingredient List (Lemon Dill Vinaigrette):
  • 1 lemon
  • 1/4 cup olive oil
  • 1 tsp dried dill weed
  • 1 tsp garlic powder
  • 1/2 tsp sea salt
  • 1/2 tsp black pepper

Instructions (Lemon Dill Vinaigrette):

1.  Add the juice of a lemon, olive oil, dill weed, garlic powder, sea salt, and black pepper to a small bowl and whisk together until completely blended.

2.  Once the vinaigrette is well mixed, pour it over the Israeli couscous filling and stir several times to completely coat the filling.

 photo MediterraneanStuffedPeppers2_zps3cdrxwyx.jpg


Ingredient List (Stuffed Peppers):

  • 6 bell peppers (I used a combination of red, yellow, and orange, but any kind of bell pepper is fine.)
  • Crumbled feta cheese for topping

Instructions (Stuffed Peppers):

1.  Preheat the oven to 350 degrees.

2.  Cut off the tops of the peppers and remove the cores and any seeds.

3.  Stuff the peppers with the filling. You don't want to fill them to the brim, but stuff them about 3/4 full. Top with crumbled feta cheese.

4.  Place the peppers in an ungreased 9x13 inch pan, snuggling them as closely together as possible. (There will likely still be some space, depending on the size of your peppers, so please make sure you move the pan gently when you place it in the oven!)

5.  Bake the peppers uncovered for 15-20 minutes. (I baked mine for the full 20 minutes.)

Tuesday, July 26, 2016

Tasty Tuesday: Mustard Roasted Potatoes

I know it's 500 degrees outside with 1000% humidity right now (or at least it's been feeling that way in Nebraska lately) and the last thing you probably want to do in such stifling weather is turn on your oven, but I'm sharing this recipe today anyway for a couple of reasons.

First, I rarely share side dish recipes. To be perfectly honest, I usually focus on the main dish and stick with easy sides: salads, Steamfresh veggies, and, yes, even boxed Rice-a-Roni. Eric and I both like all of these things, but I have to admit that sometimes we get a little bored having the same sides over and over. So sometimes it's nice to change things up a bit and try something new.

My second reason for sharing this recipe today is that, despite the fact that it involves roasting potatoes, it feels like a summer side dish to me. It could be that the mustard and potato combination reminds me of potato salad. It could be the knowledge that these potatoes are the perfect compliment to a burger. Who knows? All I know is that it felt right to share this recipe today.

 photo MustardRoastedPotatoes_zpsnywwon5u.jpg

I know that a lot of people don't love mustard. I don't know how that's possible, but I know it's true. (Just kidding. I hate a lot of things that most people enjoy, like cinnamon buns and watermelon. I get that everyone's tastes just aren't the same.)

Anyway, the point is that although these potatoes do have a bit of a tangy flavor, I didn't think they really tasted strongly of mustard. (Eric agreed.) We both love mustard, but, even though that flavor didn't shine through as much as we'd hoped, these potatoes were still damn good.

If you hate mustard, obviously you probably wouldn't want to try these potatoes in the first place. (And I can't say that I blame you.) But, if you even just like mustard a little, I'd say give these a try. (You can always cut the amount of mustard down to 2 tbsp if you're still concerned the flavor will be too strong.)

Mustard Roasted Potatoes

Adapted ever so slightly from an Ina Garten recipe on The Food Network.

Ingredient List:
  • 1 1/2 lbs small red potatoes, quartered
  • 1 small yellow onion, cut into short, thick strips
  • 3 tbsp olive oil
  • 3 tbsp Dijon mustard
  • 1 tsp garlic salt
  • 1 tsp black pepper

Instructions:

1.  Preheat the oven to 375 degrees.

2.  Line a baking sheet with aluminum foil and coat with cooking spray. 

3.  Place the quartered potatoes on the baking sheet and toss with the olive oil, Dijon mustard, garlic salt, and black pepper.

4.  Bake the potatoes for 50 minutes to 1 hour, stirring occasionally.

5.  At about 15 minutes before the end of cook time, add the yellow onion to the potatoes and stir well to combine. Once you've added the onions, you'll want to check on the potatoes a little more frequently to ensure the onions don't burn.

I personally think that side dishes should be easy, and these potatoes are no exception. Although they require quite a bit of time in the oven, the prep work is minimal and there aren't a lot of complicated instructions or fancy ingredients involved. And, once they're in the oven, you can focus on your main course (as long as you continue to check on your potatoes and stir them once in a while!).

Tuesday, July 5, 2016

Tasty Tuesday: Chickpea Shawarma Salad

Like many Americans, I spent the majority of the holiday weekend stuffing my face with fattening food. Enchiladas smothered in tons of cheese, ice cream, macaroni and cheese, burgers, fried onion rings ... Those are just a few of the delicious (but very unhealthy) things I ate.

I'm not going to pretend that I only eat healthy food most of the time because I don't. (If there was any doubt, just look at my blog name: the word "indulge" should give you some clue that my eating habits aren't always that great.) I do have some good eating habits, like working fruits and veggies into my meals, going completely vegetarian at least one day each week, and eating more chicken and fish than red meat. But, if I'm being completely honest, I eat a lot of things that aren't so great for me as well.

The thing is, I'm not that young anymore. My metabolism isn't as awesome as it used to be. (Ah, how I long for the days when I could eat a 3 lb box of chocolates in one sitting and not gain a pound!). These days I actually have to balance unhealthy and healthy eating and spend more time working out if I want to maintain and/or lose weight. 

Eating healthier doesn't mean I have to sacrifice flavor, though. This is something I've been realizing more and more as I scour the internet for recipe ideas. 

 photo ChickpeaShawarmaSalad1_zpsvb7u6uhi.jpg
I mean, just look at that picture! Yes, it's just a salad with roasted chickpeas, but it was amazing. I couldn't believe that something so simple could be packed with so much flavor! 

This salad is surprisingly filling as well. Eric and I just ate some pita chips with some hummus as our "side dish," and that was plenty. (And yes, I realize that that's a lot of chickpeas for one meal, especially considering the dressing for this salad also contains hummus ... But chickpeas are just so damn good.)

If, like me, you're a huge fan of chickpeas, you need to try this recipe. My meat loving husband even commented multiple times that this meal was really good and flavorful ... So I knew it was a real winner!

 photo ChickpeaShawarmaSalad2_zpsr3kvykgp.jpg

Chickpea Shawarma Salad

Adapted ever so slightly from a recipe on Minimalist Baker.

Ingredient List (Chickpeas and Salad):
  • 1 15 oz. can chickpeas, rinsed and drained
  • 1 tbsp olive oil
  • 1 tsp cumin
  • 1 tsp smoked paprika
  • 1 tsp turmeric
  • 1/2 tsp coriander
  • 1/2 tsp cinnamon
  • 1/2 tsp ginger
  • 1/4 tsp black pepper
  • 1/4 tsp garlic salt
  • 4-5 oz. spring mix packaged salad
  • 12 grape tomatoes, quartered
  • 1/4 cup red onion, thinly sliced
  • Pita chips for serving

Instructions (Chickpeas and Salad):

1.  Preheat the oven to 400 degrees.

2.  Line a baking sheet with aluminum foil, coat with cooking spray, and set aside.

3.  Combine the chickpeas, cumin, smoked paprika, turmeric, coriander, cinnamon, ginger, black pepper, and garlic salt in a medium bowl, mixing well to coat the chickpeas as evenly as possible. 

4.  Add the olive oil to the chickpeas and spices, and stir a few more times to coat. (I recommend tasting a chickpea at this point and adding more spices if necessary. I added a little more cumin, smoked paprika, and turmeric, but didn't measure out the exact amount.)

5.  Pour the chickpeas onto the prepared baking sheet. Be sure to spread them out in a single layer across the baking sheet.

6.  Place the chickpeas in the oven and allow them to roast for 20-22 minutes. I'd suggest checking them once about halfway through, and stirring them a bit.

7.  While the chickpeas are roasting, begin assembling the salads. I added everything to the bowls except for the pita chips at this point.

8.  When the chickpeas are finished, allow them to cool slightly. (I just let them sit at room temperature for about 3 minutes.) After they've cooled a bit, add them to the salad bowls. Pour the dressing (recipe below) over the salad and garnish with pita chips.


Ingredient List (Dressing):

  • 1/2 cup garlic hummus (I used Sabra roasted garlic hummus.)
  • 1 tsp dried dill
  • 1 lemon
  • Water to thin the dressing 

Instructions (Dressing):

1.  Add the garlic hummus and dried dill to a small bowl, stirring well to combine.

2.  Squeeze the juice from the lemon into the bowl, once again stirring well to combine. 

3.  Add water, 1 tsp at a time, until the dressing is of desired consistency. (I only had to use 2 tsp of water because my lemon was so large that it produced quite a bit of juice. I highly recommend using a larger lemon in the dressing because the juice gave it a really nice vibrant, tangy flavor.)

This made enough for two large dinner salads and one lunch sized portion of salad. If you find yourself with leftovers, I highly recommend placing everything into separate containers. I'd also suggest eating the leftovers within a day or two. 

Tuesday, May 24, 2016

Tasty Tuesday: Roasted Vegetable Gnocchi Skillet

Before I sat down to write this post, I checked to see when I last posted a pasta recipe. Since I love pasta so much, I'm always worried I'll inadvertently post way too many pasta recipes in a row. (Or can there even be too many pasta recipes? I think not, but I'm sure others would disagree.)

Anyway, when I saw that I hadn't posted a pasta dish since mid-March, I figured it was time to change that. 

 photo RoastedVegetableGnocchiSkillet1_zps93m6hjzj.jpg

Like last week's Lazy Chili Baked Nachos, this Roasted Vegetable Gnocchi Skillet is incredibly easy to put together. It's kind of a "lazy" or "cheat" recipe since the sauce came from a jar and the gnocchi is most definitely not homemade, but that really doesn't matter. What matters is that it's delicious, simple, and a great way to sneak some extra veggies into a meal.

See?

 photo RoastedVegetableGnocchiSkillet2_zpsjusobjpp.jpg

And, even though roasting vegetables obviously requires turning on the oven, there's still something about roasted veggies that screams spring/summer to me. (Though since the weather has been all over the place lately, it doesn't even matter that much if I heat up the kitchen with the oven!)

Roasted Vegetable Gnocchi Skillet

Adapted from recipes on Budget Bytes and How Sweet It Is.

Ingredient List:
  • 1 lb package potato gnocchi
  • 1 24 oz. jar marinara sauce (I used a tomato, garlic, and onion sauce, but any type of marinara sauce would work.)
  • 1 medium zucchini
  • 1 red bell pepper
  • 1 cup frozen or fresh broccoli florets (I used frozen.)
  • 1 cup spinach (I used fresh spinach leaves.)
  • 2 tbsp olive oil, divided
  • 1 tsp black pepper
  • 1 tsp garlic powder
  • 2 cloves garlic (or, if you're lazy like me, the equivalent of jarred, pre-minced garlic)
  • 1 cup shredded Parmesan cheese
  • 1 cup shredded mozzarella cheese

Instructions:

1.  Preheat the oven to 425 degrees.

2.  Cover a baking sheet with aluminum foil, coat with cooking spray, and set aside.

3.  Cut the zucchini into slices of medium thickness, then cut each slice in half. Cut the red bell pepper into short, thin strips.

4.  Spread the zucchini, red bell pepper, and broccoli florets on the prepared baking sheet, making sure that they remain in a single layer. Drizzle with 1 tbsp olive oil and sprinkle on the black pepper and garlic powder. 

5.  Place the vegetables in the preheated oven and roast for 25 minutes, or until they begin to brown a bit. They should look something like this when they're done:

 photo RoastedVegetableGnocchiSkillet3_zpsryuhpprs.jpg

6.  While the veggies are roasting, bring a large pot of salted water to a boil. Add the gnocchi and boil until they begin to float (about 3 minutes). Once they're done, drain the gnocchi in a colander and set aside.

7.  Heat the remaining tablespoon of olive oil in a large skillet over medium heat. Once the oil has heated up, add the garlic and cook for about 30 seconds to 1 minute (or until fragrant).

8.  Add the drained gnocchi to the skillet with the garlic and oil and cook for about 5-7 minutes. You'll want the gnocchi to brown and crisp up just a bit, so avoid stirring it too much. I think I stirred mine just a couple of times to try to even out the browning.

9.  After the gnocchi has finished cooking, pour in the marinara sauce. Stir in the spinach until it begins to wilt, then add the roasted vegetables. Stir everything a few times to thoroughly combine and let it cook for another 5 minutes.

10.  Cover the gnocchi, sauce, and veggies with the Parmesan and mozzarella cheeses. Cover, turn the heat to low, and let sit for a few minutes until the cheese is melted. (Or, if you're impatient like me, mostly melted.)  

Tuesday, May 17, 2016

Tasty Tuesday: Lazy Chili Baked Nachos

I've been trying to make and stick to weekly meal plans this year, but sometimes the evening doesn't go as planned and I have to be flexible. (Or, if I'm being totally honest, sometimes I get lazy and don't feel like making a meal that requires considerable time and effort.)

If I need to change things up and make something really fast and easy, 90% of the time I'll just stick a frozen pizza in the oven or make some pasta and jarred sauce. There are times, though, when I decide to get a little more creative and throw something together using random ingredients I find in the kitchen.

These nachos were the result of doing just that.

 photo LazyChiliBakedNachos_zpsfldjjfgx.jpg
One thing I love about nachos is that you can add pretty much anything and they'll be delicious. They can be a little more involved, like these Buffalo Chicken Potato Nachos with Avocado Ranch Sour Cream, or they can be super simple (like today's recipe).

Honestly, I debated whether I should even bother sharing these nachos on my blog. Sometimes when a recipe is this easy, I feel like I don't need to tell anyone how to make it. 

In the end, I decided to post it because I always appreciate when the bloggers I follow share some of their ridiculously easy go-to recipes for those nights when they don't really feel like cooking. Most of us don't have the time and energy necessary to make elaborate meals every evening, so it's nice to have a few recipes like this on hand for those "I'm too busy/lazy/tired to do anything in the kitchen" nights.

Lazy Chili Baked Nachos

A Divulge and Indulge original recipe.

Ingredient List:
  • 2 cups chili (I used a whole can of Campbell's Home Style Spicy Vegetable Chili, but any kind of chili will work. When I make homemade chili in the future, I'll probably end up using some of the leftovers to make a slightly different version of these nachos.)
  • Tortilla chips (I didn't measure them out. I just kept adding chips to the baking dish until the surface was pretty much covered. It would probably be best to just have a full bag of tortilla chips on hand so you can use as many or as few as you'd like.)
  • 1 15.5 oz. can refried beans
  • 1-1 1/2 cups shredded cheese (I used a cheddar jack blend.)
  • 1 tsp garlic powder
  • 1 tsp chipotle chili powder
  • Toppings: guacamole, fresh diced tomatoes, salsa, fresh cilantro, sliced pickled jalapeño peppers, sour cream, etc. (I used guacamole, fresh quartered grape tomatoes, and sliced pickled jalapeño peppers.)

Instructions:

1.  Preheat the oven to 375 degrees.

2.  Coat a baking dish with cooking spray and begin adding tortilla chips to cover the bottom.

3.  Heat the can of refried beans in a small pan over low heat. (This should make them easier to spoon over the tortilla chips.) Stir in the garlic powder and chipotle chili powder.

4.  Once the beans are warmed through, spoon them over the tortilla chips. 

5.  Add the chili in spoonfuls over the beans and chips.

6.  Cover the nachos with shredded cheese and sliced pickled jalapeño peppers (if you're using them).

7.  Bake the nachos for 10-15 minutes, or until the cheese is melted.

8.  Add any additional toppings and serve warm.

We had these nachos for dinner, but they would also be great for a snack or appetizer at a party. This makes a lot of food, but the recipe could easily be cut down if you don't think you can (or should) eat a huge platter of nachos.

Tuesday, April 19, 2016

Tasty Tuesday: Roasted Chickpea Tacos

Roasted chickpeas have been pretty high on my list of foods to try for quite a while. They're healthy and I knew they'd probably be pretty easy to make, but, for whatever reason, I kept putting off trying them.

When Erin posted a picture of roasted chickpeas on Instagram a few weeks ago and said they tasted like chalk, I started worrying that I would hate them too. I already had roasted chickpea tacos on the meal plan that week, and I didn't want to abandon the idea completely ... But I also didn't want to force myself to choke down something disgusting.

Thankfully my experience with roasted chickpeas was much better than Erin's!

 photo RoastedChickpeaTacos01_zps7kdwq2ca.jpg
These tacos were delicious. So delicious, in fact, that my meat loving husband gobbled them up and kept telling me how good he thought they were! I assumed he'd probably like them (I mean, he'll seriously eat anything), but I figured he would be more like, "These are pretty good, but they'd be better with some chicken or beef or something." In reality I don't think he even missed the meat (or, if he did, he didn't mention it).

Although the chickpeas require about 30 minutes in the oven, this is still a really easy and relatively quick dinner to throw together on a weeknight. I also appreciated the fact that I could keep things pretty simple and still have a really flavorful taco. As you can see from the pictures, I just topped my taco with some fresh quartered grape tomatoes, fresh cilantro, and a little guacamole ... And that's really all it needed.

I can honestly say that this is now one of my favorite vegetarian dinners. Now that I know how simple (and how delicious!) this meal is, I'll be making it often!

 photo RoastedChickpeaTacos02_zpspjg5rymc.jpg

Roasted Chickpea Tacos

Adapted from a recipe on Amuse Your Bouche.

Ingredient List:
  • 2 15 oz. cans chickpeas, rinsed and drained
  • 2 tsp chipotle chili powder
  • 2 tsp black pepper
  • 2 tsp garlic salt
  • 2 tsp cumin
  • 2 tsp Mexican oregano
  • 1/4 tsp cayenne pepper (Or more if you like really spicy foods. I actually used more, but I think this is a good starting point. If spicy isn't your thing, you can skip this altogether and reduce the amount of chili powder you add.)
  • 2 tbsp olive oil
  • 1/3 cup shredded cheese (I used a cheddar jack blend.)
  • Taco shells (I used Old El Paso Stand 'N Stuff soft flour tortillas. It was the first time I'd ever used these, and I loved them! I felt like they could hold a lot more filling than the average taco shell.)
  • Toppings (Like I said, I just used some fresh quartered grape tomatoes, fresh cilantro, and a little guacamole. I really liked the addition of the fresh tomatoes, and I'd recommend going that route instead of topping your tacos with salsa. Obviously if you're not a fan of tomatoes, you can skip that.)

Instructions:

1.  Preheat the oven to 375 degrees.

2.  Line a baking sheet with aluminum foil, coat with cooking spray, and set aside.

3.  Combine the chickpeas, chipotle chili powder, black pepper, garlic salt, cumin, Mexican oregano, and cayenne pepper (if you're using this) in a large bowl, mixing well to coat the chickpeas as evenly as possible.

4.  Add the olive oil to the chickpeas and spices, and stir a few more times to coat.

5.  Pour the chickpeas onto the prepared baking sheet. Be sure to spread them out in a single layer across the baking sheet.

6.  Place the chickpeas in the oven and allow them to roast for 30 minutes. I'd suggest checking them at least once about halfway through, and stirring them a bit.

7.  When the chickpeas are finished, place them in a large bowl. Add the shredded cheese, and gently stir a few times in order to melt the cheese throughout the chickpeas.

8.  Warm your taco shells (if desired), and then add the chickpea and cheese mixture. Top with whatever you like.

This makes quite a few tacos, so if you're not feeding many people (or you just don't want leftovers), I'd cut it down to one can of chickpeas and then readjust the amount of spices and oil accordingly. The leftovers weren't bad, but the chickpeas did dry out a little bit after they were reheated (even though I added a little water to them before I stuck them in the microwave). 

I'd also recommend cutting back on the spices if you don't want really spicy chickpeas. Ours were pretty spicy (which I love and Eric is slowly growing to like), but, as I mentioned in the ingredient section, I would probably cut back on the amount of chili powder and cayenne pepper if you're not a fan of really spicy foods.

Tuesday, April 5, 2016

Tasty Tuesday: Crockpot Garlic Herb Potatoes

As I mentioned in my last post, I've been struggling with finding my motivation. Motivation for working out, motivation for blogging, motivation for, well, pretty much everything.

I think most people get in these weird slumps from time to time, and last week I decided to just say, "Fuck it" and take some time away from the things I felt like I had to do. (And you'll see exactly how little I cared by the end of the month when I post my goals and results!)

Instead of working on blog posts, I watched countless hours of Dexter with Eric. (And yes, we've both seen it before. We randomly decided to start the series over from the beginning a few weeks ago because we both love it so much.) Instead of stressing about finding time and energy for a workout, I did yoga videos when I felt like it and didn't worry about how hard I was pushing myself.

I'd like to say that I'm completely relaxed and centered now, and that I'm ready to get back into the groove of things ... But that's not exactly true. I'm slowly getting there, but it's definitely a process.

I realize that introduction probably doesn't seem like it has anything to do with a recipe, but it actually kind of does. One thing I struggle with when I lack motivation is the inspiration to try new things in the kitchen. I either want to go the ridiculously easy route (i.e. frozen pizza, pasta and jarred sauce, grilled chicken breasts, etc.) or, if I'm really unmotivated to throw together a meal, I resort to going out or getting takeout. 

I went a little crazy with eating out last month, and the result was an emptier wallet and tighter pants. Remember how I lost two pounds in January and another two pounds in February? Well, two of those pounds found their way back after I spent the entire month of March stuffing my face with Qdoba, chocolate, gyros from my favorite Greek place, pancakes, potato chips ... The list could go on and on. The point is, I stopped caring about making stuff at home and am now regretting some of those choices.

But anyway ... There will be plenty of time to talk about that in an upcoming post. 

Today's post is all about one of the recipes I made early last week that kind of helped me get my groove back in the kitchen.

 photo CrockpotGarlicHerbPotatoes1_zpstcbk0b8k.jpg

I struggle with coming up with interesting side dishes. 98% of the time I stick with things like Steamfresh vegetables, salads, and rice. While those are all fine, I get sick of having the same thing all the time.

The only problem is that I never really feel like putting much effort into side dishes. In general, I don't love spending hours in the kitchen, but I'm much more willing to put in some extra time and effort for a main dish than for a side.

But, since I wanted to start trying new recipes again, I thought a simple side dish might be a good start. So I spent some time searching Pinterest and found this recipe. I tweaked things a bit, but it's essentially the same basic idea.

Honestly, I had no idea how these potatoes would turn out. I worried that they'd either get too mushy or wouldn't cook completely. But they were actually really good!

This isn't a fancy side dish ... Not at all. Sometimes, though, keeping things simple is best. And this combination of potatoes, garlic, butter, olive oil, and herbs is the perfect compliment to a meal.

Crockpot Garlic Herb Potatoes

Adapted ever so slightly from a recipe on Damn Delicious.

Ingredient List:
  • 3 lbs small potatoes, halved (I used a combination of red, purple, and yellow baby potatoes.)
  • 3 tbsp olive oil, divided
  • 2 tbsp unsalted butter
  • 4 cloves garlic (or, if you're lazy like me, the equivalent of jarred, pre-minced garlic)
  • 1 tsp basil
  • 1 tsp oregano
  • 1 tsp black pepper
  • 1 tsp garlic salt
  • 1/2 tsp dill

Instructions:

1.  Spray the inside of the crockpot with cooking spray.

2.  Add the halved potatoes, 2 tbsp olive oil, butter, garlic, basil, oregano, dill, and black pepper to the crockpot and mix well.

3.  Cook on low for 4-5 hours or high for 2-3 hours. (I checked my potatoes often, and, after starting them on high, switched to the low setting. I cooked them on high for 1.5 hours and then finished them on low for 2 hours. I felt like this gave me the slightly softened yet not at all mushy texture I was going for. I highly suggest checking the potatoes several times as they cook ... The cook time may differ depending on their size.)

4.  After the potatoes have cooked for about 2 hours, add the remaining 1 tbsp olive oil. This is completely optional, but I thought my potatoes seemed like they weren't completely covered in oil and butter and I worried that they might dry out if I didn't add a little more. I opted to add oil, but you could always add more butter if you prefer.

5.  At the end of cook time, add the garlic salt (or you can use regular salt if you think that's too much garlic!), and stir the potatoes several times.

Although I felt like I needed to check my potatoes regularly to ensure they didn't overcook, I still thought this was a really simple recipe. It was also a nice change from the usual steamed vegetables or salad (though definitely not as healthy!).

It probably sounds silly, but after I made these potatoes, I started feeling more excited about trying new recipes again. I guess sometimes the simplest things can work to get you back on track!

Tuesday, March 22, 2016

Tasty Tuesday: Cool and Creamy Spinach Dip

Lately I just haven't been feeling very inspired in the kitchen. I've tried a few new recipes this month, but, for the most part, I've been sticking with old favorites. (And, if I'm being completely honest, I've also been relying on eating out and convenience foods a lot lately. That's what happens when you spend a weekend visiting family in Kansas City and then have the apartment to yourself for a week while your husband is out of town. Or at least that's what happens with me.)

I thought about skipping a Tasty Tuesday post altogether this week because I really didn't have anything to share. But then I started thinking about the fact that I have a small archive of old recipes and pictures that I've never gotten around to posting here.

This spinach dip is one of those recipes.

I've made this dip countless times (though I unfortunately haven't bothered to photograph it more than once, as you can probably tell by the less than stellar picture in this post). If I need to bring something in to feed a group at work, this is my go-to recipe. I'm posting the original recipe measurements here, but I typically double (or sometimes even triple) this recipe if I know I'm feeding a crowd. Trust me ... This goes fast!

 photo CoolandCreamySpinachDip_zps2ostxjzk.jpg

Cool and Creamy Spinach Dip

A recipe from Cassie Craves.

Ingredient List:
  • 1 10 oz. package frozen chopped spinach, thawed and drained
  • 1 cup sour cream
  • 1 cup mayonnaise
  • 1/2 cup shredded Parmesan cheese (The original recipe calls for less, but I'm usually a little more generous with the cheese since everyone I serve this to seems to think more cheese equals a better dip. I don't disagree.)
  • 1 packet dry vegetable soup mix (I usually either use Knorr or Mrs. Grass. The Mrs. Grass brand comes in a box with two packets, so it's very convenient if I'm doubling the recipe.)

Instructions:

1.  Mix all of the ingredients together in a medium bowl. I usually stir the dip quite a few times to make sure everything is as evenly distributed as possible.

2.  Cover and refrigerate for at least 4 hours. (I always make this the night before I plan to serve it.)

And that's it. This is literally one of the easiest recipes I've ever made, and it's absolutely delicious.

I usually serve this with tortilla chips (as you can see from the picture), but I'm sure it would also be good with fresh vegetables, potato chips, or bread.

Tuesday, February 16, 2016

Tasty Tuesday: Vegetarian Spinach, Artichoke, and Feta Breakfast Casserole

Eric and I don't really do anything special for Valentine's Day. Neither of us hate it or anything ... We just prefer to spend our time and money celebrating birthdays and our wedding anniversary. We also always go out for a nice dinner on New Year's Eve, but that's kind of a random tradition we started a few years ago because it seemed like a good excuse to try a new restaurant. (And because we like food, obviously.)

That being said, this year we decided to make a couple of really good meals at home. If you follow me on Instagram, you've probably already seen our Valentine's Day dinner:

 photo ValentinesDayDinner2016_zpsfdnylcne.jpg
Eric made the coffee crusted steaks and grilled asparagus, and I made the red garlic mashed potatoes. They're so unhealthy (hello, entire stick of butter and heavy cream!), but they're my absolute favorite type of mashed potatoes. We don't make them often, but when we do, you better believe I eat the shit out them!

But I'm getting sidetracked ... Those potatoes aren't the focus today.

Today I'm sharing the meal we made for our Valentine's Day breakfast.

 photo VegetarianSpinachArtichokeandFetaBreakfastCasserole_zps6p4svcu6.jpg
In an effort to combat our calorie rich dinner (complete with a bottle of wine and brownies and gelato for dessert), we decided to stick with a healthier breakfast.

This breakfast casserole is beyond easy to throw together, and, if spinach and artichokes aren't your thing, it's pretty versatile. I think I'll probably play around with this basic recipe in the future, but this time I mostly stuck with the original recipe (with a couple of small changes).

Vegetarian Spinach, Artichoke, and Feta Breakfast Casserole

Adapted ever so slightly from a recipe on Skinnytaste.

Ingredient List:
  • 1 10 oz. package of frozen chopped spinach (thawed and with all excess liquid squeezed out)
  • 1 13.75 oz. can quartered artichoke hearts, drained and roughly chopped
  • 1 medium red bell pepper, diced
  • 1/2 cup green onions, diced
  • 8 large eggs
  • 4 large egg whites
  • 1/4 cup milk (I used 1%.)
  • 1/4 cup Parmesan cheese, shredded
  • 1/2 cup crumbled feta cheese
  • 2 cloves garlic (or, if you're lazy like me, the equivalent of jarred, pre-minced garlic)
  • 1 tsp black pepper
  • 1 tsp sea salt
  • 1 tsp Mrs. Dash Italian Medley

Instructions:

1.  Preheat the oven to 375 degrees.

2.  Spray a 9x13 inch pan with cooking spray.

3.  Combine the spinach, artichokes, red bell pepper, green onion, and garlic in the baking pan, stirring several times to combine and spread the ingredients evenly throughout the dish.

4.  In a medium bowl, whisk together the eggs, egg whites, milk, Parmesan cheese, black pepper, sea salt, and Mrs. Dash Italian Medley.

5.  Stir the crumbled feta into the egg mixture, then pour evenly over the vegetables in the pan.

6.  Bake for 32-35 minutes (I baked mine for 33 minutes, and it was perfect), or until a knife inserted near the center comes out clean.

7.  Allow the casserole to stand at room temperature for 8-10 minutes before cutting. 

Tuesday, February 2, 2016

Tasty Tuesday: One Pot Spanish Chickpeas and Rice

I've mentioned this a couple of times before, but I've been trying to incorporate more vegetarian meals into our weekly meal plans. We'll never go completely vegetarian (we both enjoy meat and seafood way too much), but I think it's nice to switch things up once in a while.

Budget Bytes is probably my favorite resource for vegetarian recipes.  Stephanie mentioned Budget Bytes in her Three on Thursday post last week, and I completely agree with everything she said. There are a ton of creative, simple, healthy, budget friendly meals on that site (with and without meat!), and, while I usually tweak the recipes, everything I've tried so far has been delicious.

The meal I'm posting today is no exception. I made several changes to the original recipe, and the end result was amazing.

 photo OnePotSpanishChickpeasandRice_zpsbhsjbv5l.jpg
This is probably one of the best, most flavorful vegetarian dishes I've ever made. I love that it's something a little different as well ... It's not my standard pasta dish or curry. (Though I'm definitely not knocking either of those things. I mean, my other favorite vegetarian dish is Red Curry Lentils with Coconut Jasmine Rice.)

There's just so much to love about this meal. I love that it can easily be adapted to fit your tastes. I love that it's super easy to throw together and requires minimal effort (and minimal cleanup!). I love that it's not only delicious but also pretty healthy. And, perhaps most of all, I love that my meat loving husband thought it was awesome (and didn't even say anything like, "This would be even better with some chicken!").

One Pot Spanish Chickpeas and Rice

Adapted ever so slightly from a recipe on Budget Bytes.

Ingredient List:
  • 2 14 oz. cans chickpeas, rinsed and drained
  • 1 14 oz. can diced tomatoes with their juices
  • 1 medium white onion, diced
  • 1 green bell pepper, diced
  • 1 red bell pepper, diced
  • 1 lemon
  • 4 cloves garlic (or, if you're lazy like me, the equivalent of jarred, pre-minced garlic)
  • 1/3 cup olives + 1 tsp brine (You don't have to add the brine, but I think it adds a little extra flavor. And if you're not a fan of olives, you can skip them altogether.)
  • 1 1/2 cups vegetable broth
  • 1 cup uncooked rice (I used long grain white rice. I've tried a few different types of rice in these one pot meals, and this seems to consistently be the best.)
  • 2 tbsp olive oil
  • 2 tsp smoked paprika (You'll really want to use smoked paprika for this recipe. I felt like it added a certain depth of flavor that I don't think you'd get from regular paprika.)
  • 1 tsp cumin
  • 1 tsp oregano
  • 1/2 tsp cayenne pepper (If you're not a fan of spicy food, I'd cut it back to 1/4 tsp. I thought the spiciness was pretty subtle, but Eric said he noticed the heat.)
  • 1 tsp black pepper
  • 1/2 tsp sea salt
  • 2 bay leaves

Instructions:

1. Heat the olive oil in a large skillet over medium low heat. Once the skillet has heated up, add the garlic and cook until just fragrant (between about 30 seconds and 1 minute).

2. Add the smoked paprika, cumin, oregano, cayenne pepper, black pepper, and sea salt to the skillet. Cook for about 1 minute, stirring regularly to combine with the garlic and hot oil. 

3. Add the onion, green bell pepper, and red bell pepper to the skillet. Stir several times to coat with the oil, garlic, and spices, and cook for about 5 minutes (or until the vegetables are just beginning to soften).

4. Add the rice and mix thoroughly. Allow the rice to cook for about 1-2 minutes.

5. Pour in the chickpeas, olives, olive brine (if you're using this), diced tomatoes, and vegetable broth. Stir all of the ingredients together until well combined.

6. Turn the heat up to medium high. Bring the mixture to a boil, stirring occasionally.

7. Once it has reached a boil, squeeze in the juice from the lemon and stir to combine.

8. Add the bay leaves, cover, and reduce heat to low. Simmer for about 20 minutes (or until most of the liquid is gone), stirring occasionally. (I did have to turn my heat back up to medium low after I checked on it the first time because there seemed to be a lot of liquid left. It should be fine if you turn the heat up a bit, but you'll want to stay a little closer to the stove and stir a little more frequently to make sure the rice doesn't start sticking.)

9. After it has finished cooking, turn off the heat and let it sit for about 5 minutes. After 5 minutes, remove the lid, remove and discard the bay leaves, and fluff the rice with a fork.

This makes a lot, so you should have plenty of leftovers (unless you're feeding a lot of people). And don't worry ... It still tastes great after being reheated!

Tuesday, December 1, 2015

Tasty Tuesday: Vegan Chana Masala

If, like me, you're still having some difficulty getting back into the habit of a normal (and at least somewhat healthy) meal plan after the gluttony that was last Thursday, today's recipe might be just what you need.

I've been trying to make an effort to cook meatless meals a little more often lately. I still use meat a lot, but sometimes it's nice to switch things up a bit. Plus, meatless meals help us get even more veggies and beans into our diet and help cut down our grocery bill a bit!

After reading Kristen's great post on 20+ delicious things you can do with chickpeas several months ago, I was determined to try cooking with them. I'd eaten plenty of things containing chickpeas (hummus, falafel, etc.), but I'd never actually made anything with them myself. Obviously it was time to change that, especially since I was already on a mission to come up with more meatless meals!

 photo VeganChanaMasala_zpsjtxungur.jpg
I'm so glad I decided to branch out a bit because this was really good. It's hearty and comforting (perfect for the chilly late fall evenings we've been having in Nebraska lately!), and, as an added bonus, it's healthy. It's also incredibly easy ... I think I could have made this even back when I was just learning how to cook!

I will say that if you're not a fan of tomatoes, you'll hate this. The tomato flavor is very strong, and you may need to add some additional spices prior to serving. (This obviously depends on your palate, though. I'd suggest tasting it prior to serving and then adjusting the flavor as necessary. As written, the recipe doesn't include any adjustments.)

If, however, you like the flavor of tomatoes, want to incorporate more meatless dinners into your weekly meal plans, and are open to playing around with Indian flavors, this might be the meal for you!

Vegan Chana Masala

Adapted ever so slightly from a recipe on Cookie + Kate.

Ingredient List:
  • 1 tbsp olive oil
  • 1/2 of a large yellow onion, diced (This was about 1 cup.)
  • jalapeño pepper, diced (If you want this dish to be really spicy, include more seeds or even throw in another pepper. I left some seeds in, but removed most of them since Eric doesn't love super spicy stuff.)
  • 1 28 oz. can whole crushed tomatoes in puree (You could also opt to use whole peeled tomatoes and crush them yourself with a spoon if you want a chunkier sauce. If you go with this option, make sure you use the juices as well!)
  • 2 14 oz. cans chickpeas, rinsed and drained 
  • 1/2 of a lemon
  • 3 cloves garlic (or, if you're lazy like me, the equivalent of jarred, pre-minced garlic)
  • 1 tsp ground ginger
  • 1 tsp turmeric
  • 1 tsp sea salt
  • 1 tsp paprika
  • 2 tsp cumin
  • 2 tsp coriander
  • 2 tsp garam masala
  • 1/4 tsp cayenne pepper

Instructions:

1.  Heat the olive oil in a large skillet over medium heat. 

2.  Add the onion, jalapeño pepper, and garlic to the olive oil and cook for about 5 minutes, or until the diced onions and peppers begin to soften.

3.  Stir in the ground ginger, turmeric, sea salt, paprika, cumin, coriander, garam masala, and cayenne pepper, and cook for about 30 seconds to 1 minute.

4.  Pour in the tomatoes, then squeeze in the juice from half a lemon.

5.  Add the chickpeas to the skillet, and stir several times to incorporate the spices into the sauce.

6.  Turn the heat down to medium low and allow to simmer for 20-30 minutes. (The longer it simmers, the better.) Taste and adjust the spices if necessary.

As you can see from the photo, I served this meal over white basmati rice. This will make enough for leftovers, and trust me, you'll want to save some for later ... It's even better the next day!

Tuesday, October 27, 2015

Tasty Tuesday: Tortellini Soup

I don't make a lot of homemade soups. I don't really know why I don't. I mean, I like soup. But, to be honest, I usually only want soup when I don't feel like putting a lot of effort into making something for lunch or dinner. And at that point, it's just easier to heat up a premade soup.

Making your own soup doesn't have to be time consuming or difficult, though. And the tortellini soup I'm sharing today is a perfect example.

 photo TortelliniSoup_zpsz4bp5gje.jpg

I don't know why I waited until now to share this recipe because I've been making this soup for years. It's such a great meal! It's healthy, filling, delicious, and it requires minimal effort. It also comes together quickly, which is always a plus. Sometimes you just don't have the time (or don't want to take the time) to spend an hour or more trying to put something together in the kitchen!

If you're curious, the recipe as written makes about 4 servings. The last time I made it, I used these measurements. However, this soup does reheat really well, so if you're hoping to have a lot of leftovers, I'd suggest doubling it. I'll probably double it the next time I make it. Eric and I like to take leftovers for work lunches sometimes, and we were both kind of bummed that we only got one lunch each out of this.

Tortellini Soup

A recipe from Annie's Eats.

Ingredient List:
  • 4 cups vegetable broth (You can also use chicken broth, but then it will obviously no longer be a vegetarian meal.)
  • 9 oz. cheese tortellini (I prefer to use the refrigerated kind, but you can also use frozen.)
  • 1 15 oz. can diced tomatoes with their juices
  • 3-4 cups fresh spinach leaves
  • 1 tbsp olive oil
  • 1/2 cup white onion, diced
  • 2 cloves garlic (or, if you're lazy like me, the equivalent of jarred, pre-minced garlic)
  • 1/2 tsp oregano
  • 1/2 tsp sea salt
  • 1/2 tsp black pepper
  • Shredded Parmesan cheese for serving (optional)

Instructions:

1.  Heat the olive oil in a large, deep pot (or Dutch oven) over medium high heat.

2.  Add the onion and cook until it just begins to soften (about 5 minutes).

3.  Add the garlic and cook for about 30 seconds to 1 minute, or until fragrant.

4.  Pour in the diced tomatoes with their juices, and season with the oregano.

5.  Pour in the vegetable broth, and bring the mixture to a boil.

6.  Add the tortellini and cook according to package instructions.

7.  About a minute before the tortellini is fully cooked, stir in the spinach leaves.

8.  Once the tortellini is fully cooked and the spinach is beginning to wilt, remove the pot from the heat.

9.  Season the soup with the sea salt and black pepper, and, if desired, serve topped with shredded Parmesan cheese.

If you're in the mood for a delicious, healthy soup, you should definitely give this a try. As you can probably tell from the instructions, I wasn't kidding when I said it's incredibly simple and quick. (I'd even say it barely requires more effort than heating up a premade soup.) And, as an added bonus, the tortellini cooks in the broth, so you don't even need another pot!

Tuesday, October 6, 2015

Tasty Tuesday: Simple Vegetarian Pasta with Garlic Butter Sauce

On Saturday, Eric went to his parents' house to watch the Husker game and stayed for dinner. I opted not to go in favor of getting through my portion of the decluttering/deep cleaning that needed to be done. It wasn't fun, but I was incredibly productive and felt it was a better use of my time than watching football (which is something I don't even really enjoy).

On nights like those, when I'm responsible for figuring out dinner for one, I usually just go with something simple that requires little to no cleanup. That usually means heating up a frozen pizza or a can of soup, or ordering takeout.

This Saturday, however, I wasn't really in the mood for any of that. I was starving after my cleaning frenzy, so I knew I needed something filling but quick. I decided to raid the kitchen to see what we had that I could turn into an actual decent meal, and the result is the recipe I'm sharing today.

Simple Vegetarian Pasta with Garlic Butter Sauce

When I threw this together, I had no idea whether or not it would be good. I figured the flavors would probably be decent, but I wasn't expecting much. I decided to take a picture just in case it was good enough to post on the blog (though it's not the greatest picture since I was too hungry to really bother with plating), and then sat down to eat.

After only one bite, I knew I'd be posting it here. (I then proceeded to Instagram it because, you know, that's what people do these days.) It's an incredibly simple yet flavorful meal. (Not to mention the fact that I was proud of myself for not resorting to Chinese takeout or a frozen dinner!)

This recipe should make enough for at least two people. However, if you're completely ravenous and don't give a fuck about how many carbohydrates and calories you consume (i.e. me on Saturday night), it will only feed one. I wish I were joking, but I'm not. I wolfed down the entire thing and then proceeded to eat some applesauce. (And this is why I need to stick with my "get back into a regular workout routine" goal this month!)

Simple Vegetarian Pasta with Garlic Butter Sauce

A Divulge and Indulge original recipe.

Ingredient List:
  • 6-8 oz. fettuccine or other long noodles (This is half a box or slightly less if you're only using 6 oz. of pasta.)
  • 2 tbsp unsalted butter
  • 2 cloves garlic (or, if you're lazy like me, the equivalent of jarred, pre-minced garlic)
  • 1/4 cup sun-dried tomatoes, thinly sliced (I didn't use sun-dried tomatoes packed in oil for this, but you probably could as long as all of the oil is drained from the tomatoes you're adding to the meal.)
  • 1/2 cup fresh spinach leaves
  • 1/3 cup asparagus spears, washed, trimmed, and cut into thirds (This will be about 4 or 5 spears.)
  • 1/4 tsp crushed red pepper flakes
  • 1 tsp black pepper
  • 1/4 cup shredded Parmesan cheese

Instructions:

1.  Bring a large pot of salted water to a boil.

2.  Melt the unsalted butter in a medium saucepan over medium heat. 

3.  Once the butter has melted, add the garlic and cook for about 30 seconds to 1 minute (or until fragrant).

4.  Add the sun-dried tomatoes, spinach, and asparagus to the butter and garlic. Cook over medium low heat for about 10-15 minutes, or until the asparagus is cooked and the spinach has wilted.

5.  While the sauce is cooking, add the pasta to the boiling water. Cook according to package directions until al dente and drain.

6.  Mix the sauce with the drained pasta, tossing several times to coat evenly.

7.  Add the crushed red pepper flakes, black pepper, and shredded Parmesan cheese, tossing again to coat evenly.

Now that I know how easy it can be to create something out of random things we have in our kitchen, I may try to do this a little more often. While every meal might not be as delicious as this one, it's a great way to use things up instead of wasting them. (Which, unfortunately, seems to happen a lot. We'll buy something for a specific recipe, use half of it, and the rest goes untouched.)

If I can start wasting less, I'll be really happy. And feeling like I can actually come up with great recipes on my own (no matter how simple they are) is an added bonus!

Tuesday, September 29, 2015

Tasty Tuesday: Red Curry Lentils with Coconut Jasmine Rice

I feel like I've been sharing a lot of really meaty meals lately, so I decided to switch things up a bit this week and post a vegetarian meal.

I was a little nervous about making this because I'd never made lentils at home before. Well, okay ... I'd made prepackaged lentils with sauce, but that doesn't count. I mean, you literally pop those in the microwave for a couple of minutes and they're ready.

This dish required a little more effort than that, but it was still remarkably easy. As we were eating, I kept saying, "I wish I'd realized before how easy it is to make something like this myself!" It tasted much better than the prepackaged stuff, and it was probably a little healthier since it wasn't packed with preservatives.

 photo RedCurryLentilswithCoconutJasmineRice_zpslbhmaxth.jpg

If you're intimidated by the thought of making your own curry, don't be. This is ridiculously simple to throw together. You're also using a jarred curry paste for this dish, so it's not as though you'll need to purchase 500 different spices. I honestly felt like I used fewer spices in this curry than I have in some of the other meals I've posted!

I followed the original recipes pretty closely, but made a few adjustments to some of the measurements. This makes quite a bit of curry and rice, but the leftovers taste just as good (if not better!).

Red Curry Lentils with Coconut Jasmine Rice

Adapted ever so slightly from recipes on Pinch of Yum and Mel's Kitchen Cafe.

Ingredient List (Red Curry Lentils):
  • 1 2/3 cups lentils, rinsed and picked over (If you've never cooked with lentils before, this just means that you'll want to sort through them and pick out anything that looks "weird." Apparently little rocks can find their way into packages of lentils, so if something is discolored or just looks a little "off," toss it.)
  • 1 cup white onion, diced
  • 2 tbsp unsalted butter
  • 2 tbsp red curry paste (I like to use the Thai Kitchen brand. This can be found in the Asian foods section of most grocery stores, including Super Target.)
  • 2 tsp Garam Masala
  • 1 tsp curry powder
  • 1 tsp turmeric
  • 1 tsp ginger
  • 1 clove garlic (or, if you're lazy like me, the equivalent of jarred, pre-minced garlic)
  • 1/2 tsp cayenne pepper
  • 2/3 cup lite coconut milk (I used lite to make it healthier, but you could also use regular coconut milk.)
  • 1 14 oz. can tomato puree
  • Fresh cilantro for serving

Instructions (Red Curry Lentils):

1.  Cook the lentils according to the package directions. Drain and set aside.

2.  Melt the butter in a large, deep saucepan over medium high heat. Add the onion and cook for a few minutes until slightly soft and golden.

3.  Add the curry paste, Garam Masala, curry powder, turmeric, ginger, garlic, and cayenne pepper to the onion and butter. Cook for 1-2 minutes.

4.  Stir in the tomato puree, and allow to simmer for a couple of minutes.

5.  Add the cooked lentils and coconut milk. Stir several times to thoroughly combine all the ingredients. Cover and simmer for about 20-25 minutes. (It's best to let the curry simmer as long as possible!)

6.  Serve over coconut jasmine rice (recipe below) and garnish with fresh cilantro, if desired.

Ingredient List (Coconut Jasmine Rice):
  • 2 cups jasmine rice
  • 1 1/3 cups lite coconut milk (This should use up the rest of a 14 oz. can of coconut milk.)
  • 1 2/3 cup water

Instructions (Coconut Jasmine Rice):

1.  Bring the rice, coconut milk, and water to a boil in a large saucepan over medium high heat.

2.  Cover and reduce the heat to low. Allow to simmer over low heat for about 15-20 minutes, or until the liquid is mostly evaporated.

3.  Remove from heat and allow to rest for a few minutes before fluffing with a fork.

This was seriously delicious. Eric even loved it, and he doesn't always love vegetarian meals. (To be fair, he did say "Maybe you could add chicken to this when you make it again," but then he admitted that it was really filling and tasty just as it was ... He just prefers meat with his meals.)

And, as you can see, it's a really easy meal to throw together. It's also pretty healthy, which is really important to me right now. September was kind of a "Fuck it, I'll eat and drink what I want!" month for me, so I really need to start focusing on eating a little better, cutting back on the alcohol, and getting back into an exercise routine. (But that's another post entirely.)

All rambling aside, you should definitely give this a try. If nothing else, it will prove just how easy it can be to make a (mostly) homemade curry!

Tuesday, July 21, 2015

Tasty Tuesday: Crockpot Turkey Sloppy Joes and Parmesan Zucchini Rounds

After sharing some of my most embarrassing musical guilty pleasures yesterday, I'm hoping I can redeem myself with today's recipes.

I rarely share two recipes in one post, but I decided I'd make an exception today. These two things don't have to be made together, of course, but I think they're a great combination (especially if you're trying to cut some calories!). 

 photo CrockpotTurkeySloppyJoes_zps2gnuxxiv.jpg

Eric and I have actually made these sloppy joes several times in the past, but I never bothered to post the recipe. I'm not sure why ... They're really good! We like them so much that we even made a huge batch one weekend last fall when we had a bunch of people over to watch a Husker game. They were a big hit, and everyone was surprised when we told them they were made from ground turkey. They don't taste "light" at all, but they're much lower in fat and calories than traditional beef sloppy joes.

And the zucchini? This was quite possibly one of the simplest side dishes I've ever thrown together. It's also one of the healthiest, which was a huge bonus! We usually have potato or pasta salad with these sloppy joes, so it was nice to mix things up and pair them with something lighter.

Crockpot Turkey Sloppy Joes

Adapted ever so slightly from a recipe on Six Sisters' Stuff.

Ingredient List:
  • 1 lb ground turkey
  • 1 medium white onion, diced
  • 1 green bell pepper, diced
  • 1 tbsp olive oil
  • 1 10.75 oz. can condensed tomato soup
  • 1/2 cup ketchup
  • 2 tbsp classic yellow mustard
  • 1 tbsp brown sugar
  • 1 tsp garlic salt
  • 1 tsp black pepper
  • Hamburger buns for serving
Instructions:

1.  Heat the olive oil in a large skillet over medium heat.

2.  Add the ground turkey to the skillet and cook until it is no longer pink, breaking it up as it cooks.

3.  Toss in the diced onion and green pepper near the end of cook time, cooking until just tender.

4.  Spray the inside of the crockpot with cooking spray.

5.  Drain any excess grease from the skillet, then add the turkey and vegetable mixture to the crockpot.

6.  Add the tomato soup, ketchup, mustard, brown sugar, garlic salt, and black pepper to the crockpot. Stir several times to mix thoroughly.

7.  Cook on low for 4 hours.

Parmesan Zucchini Rounds

Adapted ever so slightly from a recipe on Five Heart Home.

Ingredient List:
  • 2 medium zucchini
  • Garlic salt
  • Black pepper
  • Mrs. Dash Original blend
  • 1/3 - 1/2 cup shredded Parmesan cheese
(Please note that I didn't actually measure out how much seasoning I used. I just sprinkled my zucchini slices as evenly as possible with each of the 3 seasonings listed. Feel free to use whatever amount you like, but I will say that you shouldn't need much.)

Instructions:

1.  Preheat the oven to 425 degrees.

2.  Wash and dry the zucchini. Cut the vegetables into slices about 1/4 - 1/2 inch thick.

3.  Line a baking sheet with aluminum foil, and spray it with cooking spray.

4.  Place the zucchini slices on the baking sheet, leaving little to no space between them.

5.  Sprinkle them as evenly as possible with the garlic salt, black pepper, and Mrs. Dash.

6.  Add a tiny amount (use your best judgment because I didn't measure out how much I used on each slice) of Parmesan cheese to each of the slices.

7.  Bake for 12-15 minutes, or until the cheese has melted. (I only baked mine for 12 minutes because my cheese was melted by then and I didn't want to risk burning them. If you think you'd like the cheese a little more golden brown, I'd suggest leaving them in a little longer ... Just make sure you check on them regularly to make sure they're not getting overcooked or burnt!)

If you're looking for an easy, healthy meal full of the flavors of summer, this is it. And if sloppy joes aren't your thing, I'm sure the zucchini rounds would also pair nicely with chicken or fish.